Friday, February 22, 2013

Pattern Review: Simplicity 3635 18th Century Shift

I'm starting a new series on the blog called Pattern Review! This will be specifically to review commerical patterns (mainly historical) that I have used for my own creations. There are SO many interesting costume patterns available now, when I was just getting into costuming the options were so very limited that now it's like being a kid in a candy store. So here is my first review: Simplicity 3635, now sadly out of print.


This is the first proper 18th century shift I have made for myself, my last one was hobbled together and never really fit right. Since I'm going to making a GRAND 18th century outfit this year, it was time to redo everything from the skin out.

First of all, I really like how the major pattern companies are allowing historical costumers to create pretty historically-accurate patterns for the home sewist. It makes life so much easier! This pattern is no exception.
It went together easily for me (I've made similar styles before) but I thought I'd share a few tips for anyone making a shift for the first time:

  • Transfer every single pattern tissue mark onto your fabric as you are cutting out your fabric--mark every dot or circle and clip those notches. This will save you many headaches, especially as you are essentially putting together squares and rectangles and not anything that looks like a modern sleeve. You will need those dots and clips, trust me!
  • If you plan on using an overlock on your raw edges, serge each piece separately before assembling the pieces together. Many seams can not be serged after being sewn together because of the way it's constructed (again, squares & rectanges!). This is a great way to practicet turning corners on your serger. :)
  • Since there are gussets along the side seams, let the garment hang on a hanger overnight before hemming just in case there is any stretching at the hem. There will most likely be some hem adjustments to be made anyway--the gusset pieces usually end up being longer than the front and back pieces.
Now let's talk about this pattern. Again, I thought it went together very easily but there were a few holes in the directions. Nothing of absolute importance, but it would have been nice to be told that you needed to finish the pattern off with a hem, and how deep of a hem. No biggie here but I'd hate for a beginner sewist to get confused.


It's important to note that even though I used my normal top pattern size, the shift turned out large. After putting my stays on (photos in my next post) it didn't look too bad but if I make it again (and I'd like to) I will definitely go down a size, possibly two. Yes, you need to be able to move but there is a lot of excess fabric right now that could be removed from my torso. The sleeves also seem long to me, especially since so many 18th century gowns have sleeves that are right below the elbow. I hope I don't have to stuff the sleeve up into whatever garment I'm wearing!

Overall I'd recommend this pattern to anyone with some sewing experience, just check the sizing and remember that you *do* need to hem this pattern.:)

I made this out of a linen/ramie blend that I bought for $2/yd in the Los Angeles garment district a few years ago. Right now it's pretty stiff but I'm hoping that it will soften up a bit with washings. The directions recommend silk organza for the ruffle at the neckline (that would have been very pretty) but I just made mine out of the smock fabric. I LOVE starched white linen, and this is no exception. I can't wait to get my new outfit together so that I can wear it! Plans, plans, plans.

Friday, February 15, 2013

Costume Academy 2013

It's that time again! Costume Academy is coming up on March 9. It's always a fun day--I get to hang out with my fellow costumers and geek out all day over costumey techniques. I always get inspired (if not a little too ambitious!) after Costume Academy each year.

This year I'm teaching two basic sewing classes:

Zippers 101 (back by popular demand!)
Sewing By Hand: Taking It To the Next Level (buttonholes, blind catch stitch, and more)
I'll also be there with my millinery supplies in the Vendor Room.

For more information, please go to the GBACG webpage here. Hope to see you there!

Saturday, February 9, 2013

18th Century Dinner Magic

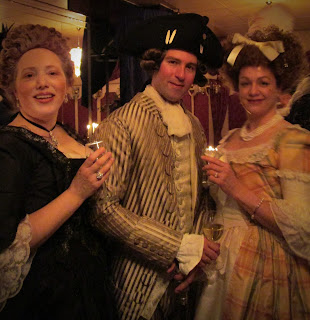
Last weekend a bunch of us Lumieres (an18th century social group) got together for a deeeeelightful dinner at a Russian restaurant called Babushka in Walnut Creek. I have never been more happily stuffed with potato and cheese dishes as I was that evening, so much so that my new stays got a little snug and the idea of dancing went out the window! But the costumes, good company, and very pretty atmosphere made for a very lovely evening.

AND I finally finished my Brunswick! Not all by hand as I originally intended (I do enough hand sewing with my hats) but it was finished enough to be wearable! Here's me at the table, I haven't seen any full length photos yet:
I still need to make proper cuffs for the sleeves instead of just doing a quick hem and adding a bit of lace but otherwise, it's pretty much done. I actually wasn't as crazy about the style as I thought I would be--thought it made me look slightly matronly until I remembered that the Brunswick was primarily a traveling costume and was probably the 18th century equivalent of wearing yoga pants on long car trips. It's not super fitted at the waist (something I prefer) and the neckline is a bit more modest than I'm used to for this period but it fits well, was comfortable to wear and overall I'm happy with how it turned out.

My original Brunswick posts are here and here.

I also made new stays for this event as the pair I made a few years ago are too big. I used Simplicity 3635 and the fit is perfect, I didn't make any adjustments at all. That NEVER happens! Next time I could add a tiny bit to the strap length (I'm a little on the tall side) and I still need to bind the bottom edge but other than that I'm a happy camper. I'll write about them on my next post when I get started documenting some pretty hefty projects for a big trip I'm planning next year. (!!!)

Here are a few photos of the event. I didn't take a lot of photos but below I have linked to a couple of posts by friends who also blogged about the event.

Pretty Dresses!

Bunny 

And of course we had champagne. Russian wine, too! 


Lots more lovely photos and dress diaries on Kendra's blog and on Sarah's blog.

Monday, October 22, 2012

What's New? (Lots!)

Hello Blog world!

It's been a while, I know, but I've been very happily getting ready for what is going to be a packed show season! I'm taking Lulu Deux Millinery all over the SF Bay Area for lots of fall and holiday shows. I'm definitely a "mad"and happy hatter right now--there are hats and flowers and fabric and trims all over my studio. I've never had more fun. I've even got a new fez design out for the menfolk!

FabMo is a wonderful non-profit that distributes interior design samples to the public that would otherwise end up in the landfill. 
Add caption

Here are just a few of my upcoming shows. You can find my complete show schedule here on my website.

And....here is that fez I was talking about!


Thursday, August 30, 2012

How to jazz up a styrofoam head

Now that I'm working on a lot more millinery, and signing up for a lot more shows, I found I had a dilema: How do I display everything?

When I first started my business, I bought a couple of these painted mannequin heads and Halloween wigs to really jazz up my outdoor display, especially when I was out on Telegraph Avenue. It's all about getting attention, right? But they aren't really fitting in with the way my booth currently looks. It was time to try something new. It was time to mess around with a styrofoam wig head.

I only had one on hand, holding a wig in a vintage wig case. Somewhere, deep in my studio, was a box of old art supplies from my "let's try decoupage!" phase.

I also had a box of faux parchment paper. Just like in grade school, I began to rip it into strips and pieces. The varnish didn't work, by the way--not only had it separated into solid and not-solid, but, as I also realized from grade school, the sticky stuff needs to smell like glue! Thank goodness I did have the decoupage finish too, and it still had the right consistentency.

I glued on about two layers of the paper, going round and round until I was happy with how it looked. Tearing the paper definitely made a difference too since (again, more grade school memories!) the torn paper made a flatter seam. I also tore itty bitty pieces to go around the nose and mouth.

I highly recommend doing this over a pie pan since it's a wet, sticky mess. Had I done it on newspaper only, I suspect the newspaper would have been stuck all over the base of the head and it would have stained the table. I also liked the foam brush because it could hold a lot of the glue--after all, you want those paper strips to be pretty much soaked, right?

Here's a tip: don't do your nails the night before handling wet paper covered in glue. Your carefully painted digits will be covered in gobs of sticky, glue covered paper that loves to hang onto, and peel off, nailpolish.  Ironically, I almost NEVER paint my fingernails since I work with my hands so much but I had a girly moment the night before. Ah, well. Live and learn.

The next day she was completely dry and I gave her a test run by setting her on a wig base (the base adds weight and stability) and displaying hats on her at a show. I've also started using her as my model for my photos:

I'm still figuring out the perfect combination of backdrop + display when I take photos, but this was definitely a good (and inexpensive!) solution to my display needs, and I like the vintagey look. I'll need to make about 5 more so I have a nice display at my next show. I'll do it right after I do my nails....


Friday, August 10, 2012

So you want to be an artisan who sells at craft shows...

A bunch of new fascinators, ready to go!
Tomorrow I have to get up *before* the crack of dawn to get to Benicia for the Benicia Peddler's Fair so I decided to spend the morning getting everything ready for my booth. And I'm ready! This is amazing, actually, because usually I'm up late ironing, tagging, sorting. I hardly know what to do with myself (well, yes I do, but I'm taking a wee break). Knowing that not everyone has experienced the life of an artisan who sells at craft shows, let me give you a few tips if you are thinking of doing a craft show:
  • It takes a while, and I do mean at least a year or two, to get "everything" you need for your booth. You will be tweaking things as you go, getting rid of things that don't work, spending more money on nice fitted tablecloths. This is normal. Don't worry about everything not being perfect the first time. This is my umpteenth show and I still spent plenty of time worrying about things like how I'm going to set up my booth.
  • Bring water, snacks that aren't messy, and handwipes. You may not get many breaks so having snacks and water on hand might save you from the grumpies. And handwipes are essential--port-o-potties might be your least favorite thing in the world but sometimes you have no other options, or, the flushies have a line a mile and half long.
  • Engage with, but don't crowd or ignore your customers. Which would you rather see, a friendly face who greets you when you walk into their booth or someone who either a) won't look up from their book or b) follows you around, not letting you browse? When you are selling items that you have created, you are also selling who you are. It's better to be comfortable with that. (It's also a good idea to not take it personally if the entire world isn't buying your work. It just won't happen. And that's okay.)
  • Not every show will be The Best Show Ever. Some shows will be wonderful, some will be "meh" and some will be awful. The more you do this, the more you will find out about other shows. Talk to other vendors (when it's quiet) about shows they like. you will get a lot of tips this way. If you are on Etsy, join local teams and find out about shows in your area that you haven't heard of before. If you can, visit shows you might like to do the following year. Call it Marketing Research.
  • Have lots of business cards available that link to your website and give them out freely. Not everyone is a customer at the show, but they might be later.
This is only a partial list but I hope it's helpful! Now I think I'll double check that I have everything ready for tomorrow....

Sunday, July 8, 2012

A little vintage swimsuit project


So I got invited to a vintage beach party recently and took it upon myself to make a whole new outfit because...well, I just love that kind of challenge, I wanted a vintage suit anyway, AND I dislike modern suits. A LOT. I also had to do this with a zero budget (now that's a challenge!) using only what I had in the stash. The good news is I have a pretty mighty stash....

I knew I was going to use a blue and white cotton gingham that has been sitting in the stash so first I started making the hat with a coordinating blue and white railroad stripe, machine embroidered with a cherry motif. The hat is blocked over a mini-pillbox fascinator base that I have, then wired, then covered with the ribbon and fabric. I know I'll wear this one again!


Next came the swimsuit challenge. I didn't want to reinvent the wheel and draft something from scratch so I pieced together a two piece suit inspired by the photo above using patterns in the stash. I was going for "pin-up-ish," not historically pristine. My first attempt at making a halter style top was a disaster--the pattern I had from the 1970's didn't fit my body in any way at all. I mean, seriously the craziest fit I have ever seen on a standardized commercial pattern! Not wanting to waste time trying to make it fit, I chucked it and grabbed the top of a modern halter dress pattern that I know and love, McCall's 4826 (sadly discontinued) and whipped up that top in the blue check with red piping. Whew!

The swimsuit bottoms were a LOT of fun to make. Historically suits were not made out of the swimsuit fabric we have today, they were often made out of woven materials. I just happened to have a swimsuit pattern from the 1970's that was made for woven fabrics and HAS BUILT IN BLOOMERS!! I have wanted to make this one for years. Here's what the bloomers looked like before everything was assembled:


Recognize the fabric? It was leftover from this project. And yes, I did embroider the cherries onto the leg of the swimsuit too, I just felt like being kind of matchy-matchy that way.

So what was it like wearing a vintage, non-stretchy swimsuit? It certainly took a little getting used to, but being used to wearing historical costumes that change the way you move (or how much you can physically move) I just felt that I needed to treat it the same way. And actually, I was quite comfortable with the amount of coverage, and the fact that I could sit comfortably knowing that my bloomers were keeping me from accidentally flashing anyone. The only thing I wasn't used to was how long it took to dry after a dip in the pool but that wasn't too big a deal on a hot day.

Here's the whole outfit! Would I wear it again? Sure! And it wouldn't even have to be to a "vintage" event, I'd wear this instead of a modern suit any day.